This tutorial is part of a series of blog posts on getting a web page on your web server to communicate via web3 with your Ethereum test network on localhost.
In our previous post, we created the first block in our testnet using a CustomGenesis.json. In the CustomGenesis.json, we set the difficulty attribute to a very low value, which will enable us to mine some Ether on our testnet quickly.
In this tutorial, we’ll describe how to mine for Ether on your testnet.
In your Terminal, run the following command to create a new account on your testnet. All of the arguments should look familiar. Pay special attention to the account new, which will create a new user.
Joels-MBP-4:Clients joelgarcia$ geth --networkid 200 --identity node1 --verbosity 3 --nodiscover
--nat none --datadir=~/myBlockChain/node1 account new
After you enter the password for this new user, you’ll be provided with the unique id for your new user. Copy and paste the address to a safe place.
Address: {446e063b51d75ef76ab66c2307e04ced44f39ea6}
You should also be able to see this user in your file system by opening up Finder to your myBlockChain directory.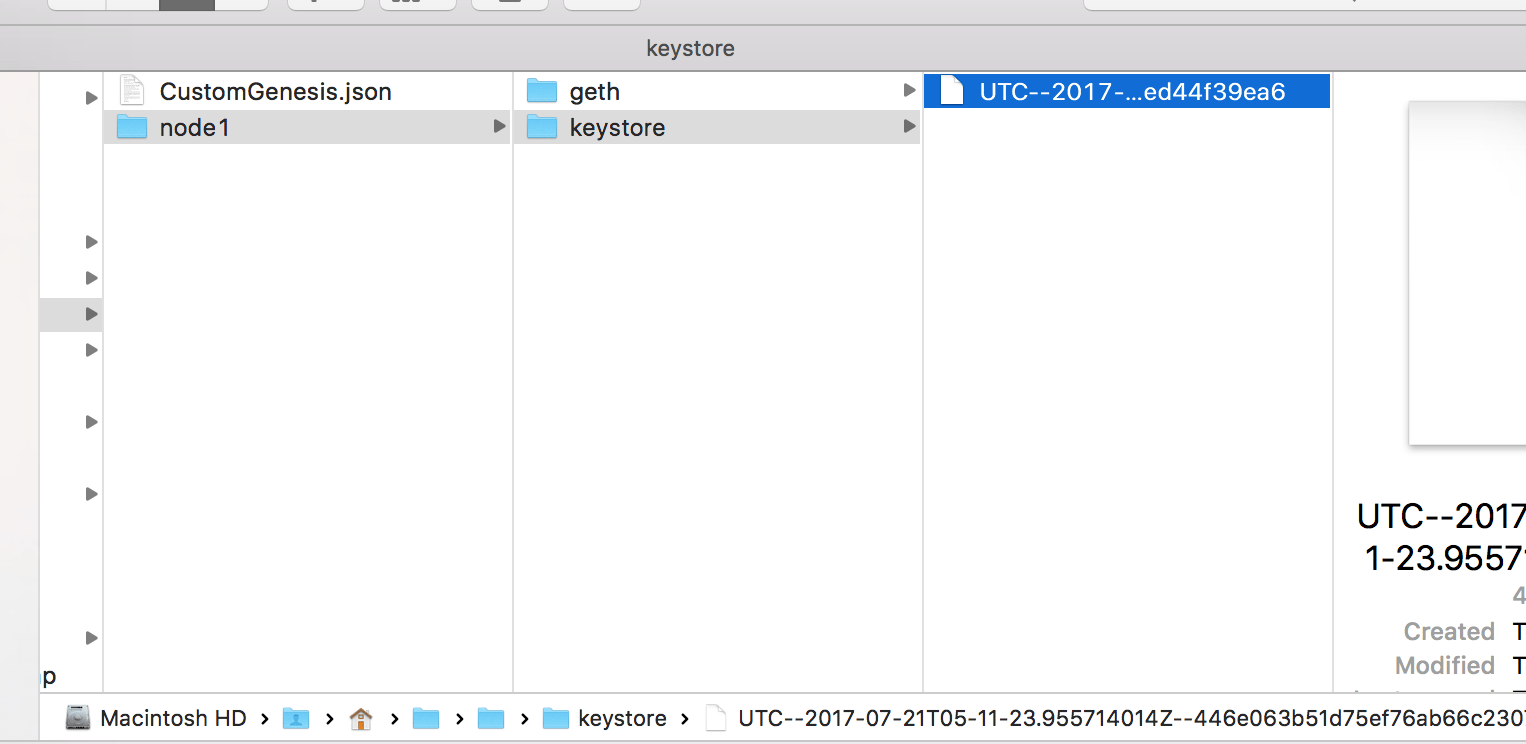
Next, we’re going to start up geth. We’re going to start up geth to enable RPC so that Mist and our web pages in the future can access geth.
geth --networkid 200 --identity node1 --datadir=~/myBlockChain/node1 --rpc
--rpcaddr "127.0.0.1" --rpcport "8545" --rpccorsdomain "*"
Most of the parameters should look familiar. We’ve added arguments to enable RPC to enable remote procedure calls to 127.0.0.1, localhost, over port 8545, for all domains. You would not want to run this for a production environment as you’re enabling any domain to access via RPC.
In the subsequent results, you should see that the testnet has started. Make note of your IPC endpoint in the second to last line as we’ll use it next.
INFO [fusion_builder_container hundred_percent="yes" overflow="visible"][fusion_builder_row][fusion_builder_column type="1_1" background_position="left top" background_color="" border_size="" border_color="" border_style="solid" spacing="yes" background_image="" background_repeat="no-repeat" padding="" margin_top="0px" margin_bottom="0px" class="" id="" animation_type="" animation_speed="0.3" animation_direction="left" hide_on_mobile="no" center_content="no" min_height="none"][07-20|22:07:32] IPC endpoint opened: /Users/joelgarcia/myBlockChain/node1/geth.ipc
INFO [07-20|22:07:32] HTTP endpoint opened: http://127.0.0.1:8545
Open another Terminal shell. In this Terminal shell, we’re going to connect to the existing geth server via ipc. Type the following replacing my ipc endpoint address with your ipc endpoint address into the Terminal shell.
geth attach /Users/joelgarcia/myBlockChain/node1/geth.ipc
The output from the geth attach should be a subsequent command prompt
Welcome to the Geth JavaScript console!
instance: Geth/node1/v1.6.6-stable-10a45cb5/darwin-amd64/go1.8.3
 modules: admin:1.0 debug:1.0 eth:1.0 miner:1.0 net:1.0 personal:1.0 rpc:1.0 txpool:1.0 web3:1.0
>
At the Geth Javascript console, we’re going to associate the new user that we previously created with the miner.
Type the following command to verify that your user is in the system. The results should be the same address as the results from the new account creation. In this case,
> personal.listAccounts[0]
"0x446e063b51d75ef76ab66c2307e04ced44f39ea6"
Next, we’re going to associate the miner with this account.
> miner.setEtherbase(personal.listAccounts[0])
true
Last, but not least, we’ll start to mine Ether.
> miner.start()
null
All of a sudden in your geth instance Terminal, you should start to see a ton of activity as the DAG starts to get built
INFO [07-20|22:20:01] Starting mining operation
INFO [07-20|22:20:01] Commit new mining work                   number=1 txs=0 uncles=0 elapsed=665.777µs
INFO [07-20|22:20:03] Generating DAG in progress               epoch=0 percentage=0 elapsed=493.162ms
INFO [07-20|22:20:03] Generating DAG in progress               epoch=0 percentage=1 elapsed=974.826ms
INFO [07-20|22:20:04] Generating DAG in progress               epoch=0 percentage=2 elapsed=1.473s
INFO [07-20|22:20:04] Generating DAG in progress               epoch=0 percentage=3 elapsed=1.991s
INFO [07-20|22:20:05] Generating DAG in progress               epoch=0 percentage=4 elapsed=2.479s
The CPU will get very busy as you build the DAG and start to mine.

Ethereum Miner 400 Difficulty
After you’ve created the DAG, you’ll start to see the new mining work in the output of your first Terminal shell.
INFO [07-20|22:22:44] Commit new mining work number=84 txs=0 uncles=0 elapsed=138.825µs
Go back to the Geth JavaScript console that is attached via IPC, and type the following to stop the miner
> miner.stop()
true
The CPU utilization should dramatically reduce on your Mac. Next, we’re going to want to see how much Ether we mined. Type the following into the Ether JavaScript Console
> eth.getBalance(personal.listAccounts[0])
455000000000000000000
Wow, we mined a lot of Ether on our testnet. In our next tutorial, we’ll demonstrate how to connect Mist to our local testnet so we can see how much ether is in the account through the Wallet. We’ll then start to fire up a Node.js http server to connect to our Geth instance via RPC.[/fusion_builder_column][/fusion_builder_row][/fusion_builder_container]

Joel Garcia has been building AllCode since 2015. He’s an innovative, hands-on executive with a proven record of designing, developing, and operating Software-as-a-Service (SaaS), mobile, and desktop solutions. Joel has expertise in HealthTech, VoIP, and cloud-based solutions. Joel has experience scaling multiple start-ups for successful exits to IMS Health and Golden Gate Capital, as well as working at mature, industry-leading software companies. He’s held executive engineering positions in San Francisco at TidalWave, LittleCast, Self Health Network, LiveVox acquired by Golden Gate Capital, and Med-Vantage acquired by IMS Health.