This tutorial is part of a series of blog posts on getting a web page on your web server to communicate via web3 with your Ethereum on localhost.
In our previous post, we installed the Ethereum Wallet. The Ethereum Wallet is a nice way to visualize what’s going on with Ethereum, but for our purposes initially we don’t actually want the production blockchain because we don’t want to mine or purchase Ether on the production blockchain. We want to deploy to our own private chain.
In this tutorial, we’ll describe the steps to install Ethereum on your computer. We’ll install Ethereum on your computer to enable you start up a local private chain.
I’m on Mac so we’ll leverage Homebrew.
Step 1. Install Homebrew
Navigate to your Terminal shell. Type the following command, ‘brew — version’
Joels-MBP-4:tensorflow joelgarcia$ brew --version

Homebrew 0.9.9 (git revision 2b9a; last commit 2016-07-21)

Homebrew/homebrew-core (git revision 926d; last commit 2016-07-23)
If Homebrew is not installed on your computer, install it using the following command:
/usr/bin/ruby -e "$(curl -fsSL http://raw.githubusercontent.com/Homebrew/install/master/install)"
If you don’t have XCode installed, then you may need to look here.
In this step, we install the Go implementation of Ethereum protocol (Geth).
Geth can be installed by typing in the following commands:
Joels-MBP-4:tensorflow joelgarcia$ brew update
Joels-MBP-4:tensorflow joelgarcia$ brew tap ethereum/ethereum
Joels-MBP-4:tensorflow joelgarcia$ brew install ethereum
Upon completion of the ethereum install, you’ll want to check the Geth Version
Joels-MBP-4:~ joelgarcia$ geth version
Geth
Version: 1.6.6-stable
Git Commit: 10a45cb59bd9bc9f717817afc029a57b222e558d
Architecture: amd64
Protocol Versions: [fusion_builder_container hundred_percent="yes" overflow="visible"][fusion_builder_row][fusion_builder_column type="1_1" background_position="left top" background_color="" border_size="" border_color="" border_style="solid" spacing="yes" background_image="" background_repeat="no-repeat" padding="" margin_top="0px" margin_bottom="0px" class="" id="" animation_type="" animation_speed="0.3" animation_direction="left" hide_on_mobile="no" center_content="no" min_height="none"][63 62]
Network Id: 1
Go Version: go1.8.3
Operating System: darwin
GOPATH=
GOROOT=/usr/local/Cellar/go/1.8.3/libexec
Step 3. Update Geth
If Geth was already installed on your computer, update it to the latest version:
Joels-MBP-4:~ joelgarcia$ brew update
Joels-MBP-4:~ joelgarcia$ brew upgrade ethereum
If you have trouble to update Geth, use the following commands to force the update:
Joels-MBP-4:~ joelgarcia$ brew tap ethereum/ethereum
Joels-MBP-4:~ joelgarcia$ brew unlink ethereum
Joels-MBP-4:~ joelgarcia$ brew install ethereum
Step 4 – Run Geth
Start Geth using the following command:
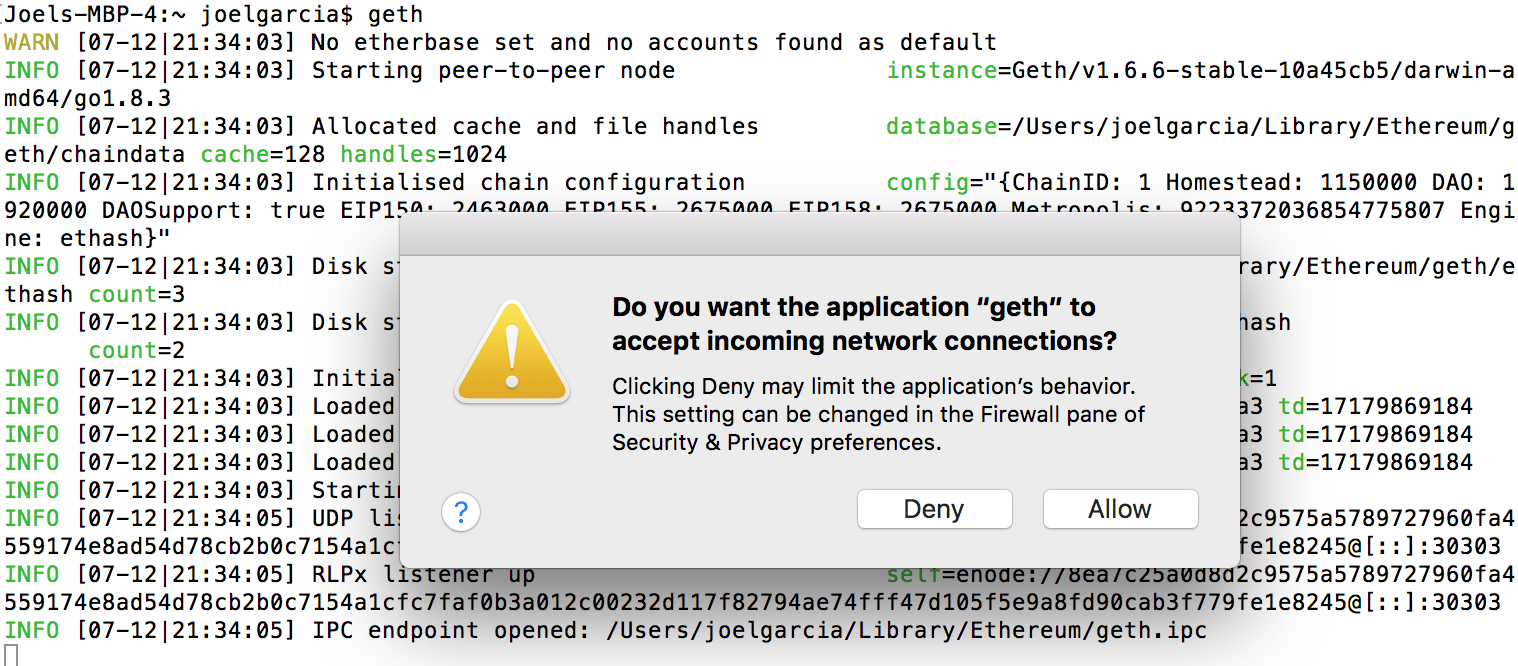
Now Ethereum is up and running. It’s synching with the public chain data. We’ll want to stop this. Otherwise it will suck up all of our CPU. Do a Ctrl+C to shut down Ethereum.[/fusion_builder_column][/fusion_builder_row][/fusion_builder_container]

Joel Garcia has been building AllCode since 2015. He’s an innovative, hands-on executive with a proven record of designing, developing, and operating Software-as-a-Service (SaaS), mobile, and desktop solutions. Joel has expertise in HealthTech, VoIP, and cloud-based solutions. Joel has experience scaling multiple start-ups for successful exits to IMS Health and Golden Gate Capital, as well as working at mature, industry-leading software companies. He’s held executive engineering positions in San Francisco at TidalWave, LittleCast, Self Health Network, LiveVox acquired by Golden Gate Capital, and Med-Vantage acquired by IMS Health.